业余手工猛料打造24V3000W高频正弦波逆变器(已公布完整的方案)
有段时间没搞机子了,最近手有点“痒”,却又无奈业余搞条件有限,很多东西都搞不漂亮,比如这次的变压器,凡立水有点稠,也没稀释剂,泡好凡立水了,也没烤箱烤干,只好放在锅里烤,呵呵.
全部回复(598)
正序查看
倒序查看
现在还没有回复呢,说说你的想法
先讲变压器吧,24V3000W,为了减少安装高度,加强散热,前级MOS均流没有用一个EE70而用了4个EC42-20,PC40材质的,为了每个上到750W,采用了约35KHZ的频率,初级4T+4T,用0.8mm的线9根并绕,次级16T用0.8mm的线4根并绕.4个EC42初级并联,次级串联,因为初级电流太大没用骨架引脚,铜线直接焊在PCB上.
 500) {this.resized=true; this.width=500; this.alt='这是一张缩略图,点击可放大。\n按住CTRL,滚动鼠标滚轮可自由缩放';this.style.cursor='hand'}" onclick="if(!this.resized) {return true;} else {window.open('http://u.dianyuan.com/bbs/u/83/700751258992178.jpg');}" onmousewheel="return imgzoom(this);">
 500) {this.resized=true; this.width=500; this.alt='这是一张缩略图,点击可放大。\n按住CTRL,滚动鼠标滚轮可自由缩放';this.style.cursor='hand'}" onclick="if(!this.resized) {return true;} else {window.open('http://u.dianyuan.com/bbs/u/83/700751258992178.jpg');}" onmousewheel="return imgzoom(this);">
 0
回复
提示
功率PCB:预留了一个前级闭环控制的EC42-20做整流后的电感,实际用的开环,没装.
 500) {this.resized=true; this.width=500; this.alt='这是一张缩略图,点击可放大。\n按住CTRL,滚动鼠标滚轮可自由缩放';this.style.cursor='hand'}" onclick="if(!this.resized) {return true;} else {window.open('http://u.dianyuan.com/bbs/u/83/700751258992413.jpg');}" onmousewheel="return imgzoom(this);">
 500) {this.resized=true; this.width=500; this.alt='这是一张缩略图,点击可放大。\n按住CTRL,滚动鼠标滚轮可自由缩放';this.style.cursor='hand'}" onclick="if(!this.resized) {return true;} else {window.open('http://u.dianyuan.com/bbs/u/83/700751258992413.jpg');}" onmousewheel="return imgzoom(this);">
 0
回复
提示
3000W的功率,除了效率要高,要强制风冷,散热片也很重要,用了一整块和功率板差不多大的散热片,所有前后级的功率管和整流管都装在上面,重约1.5KG.
 500) {this.resized=true; this.width=500; this.alt='这是一张缩略图,点击可放大。\n按住CTRL,滚动鼠标滚轮可自由缩放';this.style.cursor='hand'}" onclick="if(!this.resized) {return true;} else {window.open('http://u.dianyuan.com/bbs/u/83/700751258992738.jpg');}" onmousewheel="return imgzoom(this);">
 500) {this.resized=true; this.width=500; this.alt='这是一张缩略图,点击可放大。\n按住CTRL,滚动鼠标滚轮可自由缩放';this.style.cursor='hand'}" onclick="if(!this.resized) {return true;} else {window.open('http://u.dianyuan.com/bbs/u/83/700751258992738.jpg');}" onmousewheel="return imgzoom(this);">
 0
回复
提示
@xzszrs
功率PCB:预留了一个前级闭环控制的EC42-20做整流后的电感,实际用的开环,没装.[图片]500){this.resized=true;this.width=500;this.alt='这是一张缩略图,点击可放大。\n按住CTRL,滚动鼠标滚轮可自由缩放';this.style.cursor='hand'}"onclick="if(!this.resized){returntrue;}else{window.open('http://u.dianyuan.com/bbs/u/83/700751258992413.jpg');}"onmousewheel="returnimgzoom(this);">
总工150A的电流怎样处理?
0
回复
提示
功率管,前级用的是IRFP2907,8只,原装进口管. 500) {this.resized=true; this.width=500; this.alt='这是一张缩略图,点击可放大。\n按住CTRL,滚动鼠标滚轮可自由缩放';this.style.cursor='hand'}" onclick="if(!this.resized) {return true;} else {window.open('http://u.dianyuan.com/bbs/u/83/700751258993198.jpg');}" onmousewheel="return imgzoom(this);">
 500) {this.resized=true; this.width=500; this.alt='这是一张缩略图,点击可放大。\n按住CTRL,滚动鼠标滚轮可自由缩放';this.style.cursor='hand'}" onclick="if(!this.resized) {return true;} else {window.open('http://u.dianyuan.com/bbs/u/83/700751258993198.jpg');}" onmousewheel="return imgzoom(this);">
 0
回复
提示
后级功率管4只FQL40N50,仙童40A500V的管子: 500) {this.resized=true; this.width=500; this.alt='这是一张缩略图,点击可放大。\n按住CTRL,滚动鼠标滚轮可自由缩放';this.style.cursor='hand'}" onclick="if(!this.resized) {return true;} else {window.open('http://u.dianyuan.com/bbs/u/83/700751258993329.jpg');}" onmousewheel="return imgzoom(this);">
 500) {this.resized=true; this.width=500; this.alt='这是一张缩略图,点击可放大。\n按住CTRL,滚动鼠标滚轮可自由缩放';this.style.cursor='hand'}" onclick="if(!this.resized) {return true;} else {window.open('http://u.dianyuan.com/bbs/u/83/700751258993329.jpg');}" onmousewheel="return imgzoom(this);">
 0
回复
提示
@huamg
总工150A的电流怎样处理?
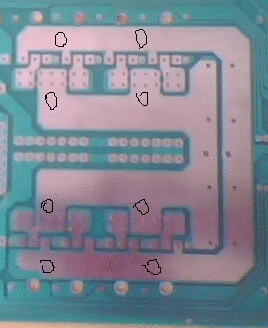
办法一:加焊扁铜;
办法二:在下图标示处焊4组电池线,在接线柱上会合:
 500) {this.resized=true; this.width=500; this.alt='这是一张缩略图,点击可放大。\n按住CTRL,滚动鼠标滚轮可自由缩放';this.style.cursor='hand'}" onclick="if(!this.resized) {return true;} else {window.open('http://u.dianyuan.com/bbs/u/83/700751258993605.gif');}" onmousewheel="return imgzoom(this);">
办法二:在下图标示处焊4组电池线,在接线柱上会合:
 500) {this.resized=true; this.width=500; this.alt='这是一张缩略图,点击可放大。\n按住CTRL,滚动鼠标滚轮可自由缩放';this.style.cursor='hand'}" onclick="if(!this.resized) {return true;} else {window.open('http://u.dianyuan.com/bbs/u/83/700751258993605.gif');}" onmousewheel="return imgzoom(this);">
 0
回复
提示
前后级驱动板:由于采用了单片机控制后级所以做的比较简单,元件较少,也用的单面板.
 500) {this.resized=true; this.width=500; this.alt='这是一张缩略图,点击可放大。\n按住CTRL,滚动鼠标滚轮可自由缩放';this.style.cursor='hand'}" onclick="if(!this.resized) {return true;} else {window.open('http://u.dianyuan.com/bbs/u/83/700751258993865.jpg');}" onmousewheel="return imgzoom(this);">
 500) {this.resized=true; this.width=500; this.alt='这是一张缩略图,点击可放大。\n按住CTRL,滚动鼠标滚轮可自由缩放';this.style.cursor='hand'}" onclick="if(!this.resized) {return true;} else {window.open('http://u.dianyuan.com/bbs/u/83/700751258993877.jpg');}" onmousewheel="return imgzoom(this);">
 500) {this.resized=true; this.width=500; this.alt='这是一张缩略图,点击可放大。\n按住CTRL,滚动鼠标滚轮可自由缩放';this.style.cursor='hand'}" onclick="if(!this.resized) {return true;} else {window.open('http://u.dianyuan.com/bbs/u/83/700751258993865.jpg');}" onmousewheel="return imgzoom(this);">
 500) {this.resized=true; this.width=500; this.alt='这是一张缩略图,点击可放大。\n按住CTRL,滚动鼠标滚轮可自由缩放';this.style.cursor='hand'}" onclick="if(!this.resized) {return true;} else {window.open('http://u.dianyuan.com/bbs/u/83/700751258993877.jpg');}" onmousewheel="return imgzoom(this);">
 0
回复
提示
@xzszrs
后级功率管4只FQL40N50,仙童40A500V的管子:[图片]500){this.resized=true;this.width=500;this.alt='这是一张缩略图,点击可放大。\n按住CTRL,滚动鼠标滚轮可自由缩放';this.style.cursor='hand'}"onclick="if(!this.resized){returntrue;}else{window.open('http://u.dianyuan.com/bbs/u/83/700751258993329.jpg');}"onmousewheel="returnimgzoom(this);">
搬凳子来学习,哈哈,又是大手笔阿!40N50 264的封装好大,很猛,请问钟工为何后极不用IGBT来做呢?还有短路保护是如何取得?
0
回复
提示
@xzszrs
功率PCB:预留了一个前级闭环控制的EC42-20做整流后的电感,实际用的开环,没装.[图片]500){this.resized=true;this.width=500;this.alt='这是一张缩略图,点击可放大。\n按住CTRL,滚动鼠标滚轮可自由缩放';this.style.cursor='hand'}"onclick="if(!this.resized){returntrue;}else{window.open('http://u.dianyuan.com/bbs/u/83/700751258992413.jpg');}"onmousewheel="returnimgzoom(this);">
呵呵,来学习下
0
回复
提示
@xzszrs
我也是搞着玩,我是手头有啥用啥,实验完了可能又拆了.
钟工,这么好的东西拆了可惜了啊,还是卖我收藏吧 !! 500) {this.resized=true; this.width=500; this.alt='这是一张缩略图,点击可放大。\n按住CTRL,滚动鼠标滚轮可自由缩放';this.style.cursor='hand'}" onclick="if(!this.resized) {return true;} else {window.open('http://u.dianyuan.com/bbs/u/83/3228701259031117.gif');}" onmousewheel="return imgzoom(this);">
 500) {this.resized=true; this.width=500; this.alt='这是一张缩略图,点击可放大。\n按住CTRL,滚动鼠标滚轮可自由缩放';this.style.cursor='hand'}" onclick="if(!this.resized) {return true;} else {window.open('http://u.dianyuan.com/bbs/u/83/3228701259031117.gif');}" onmousewheel="return imgzoom(this);">
 0
回复
提示

