我们经常能看到利用OLED来显示一些图案,那这些图片素材是怎么实现的呢?今天我们就来分享一下相关内容。
实现目标
- 修改原Demo工程的主芯片为STM32F103RET6
- 按实际连接修改源码
- 制作一个图片素材并显示
获取Demo源码
之前我们分享过0.96寸OLED的相关文章(见文末的相关阅读),我们今天就在之前的源码基础上完成本文的实例,源码的获取方式如下图所示:

修改源码
修改主芯片
之前分享的这个源码,由于使用的是 STM32F103C8T6 为主芯片的最小系统板分享的,所以首先我们要把这个工程修改一下:
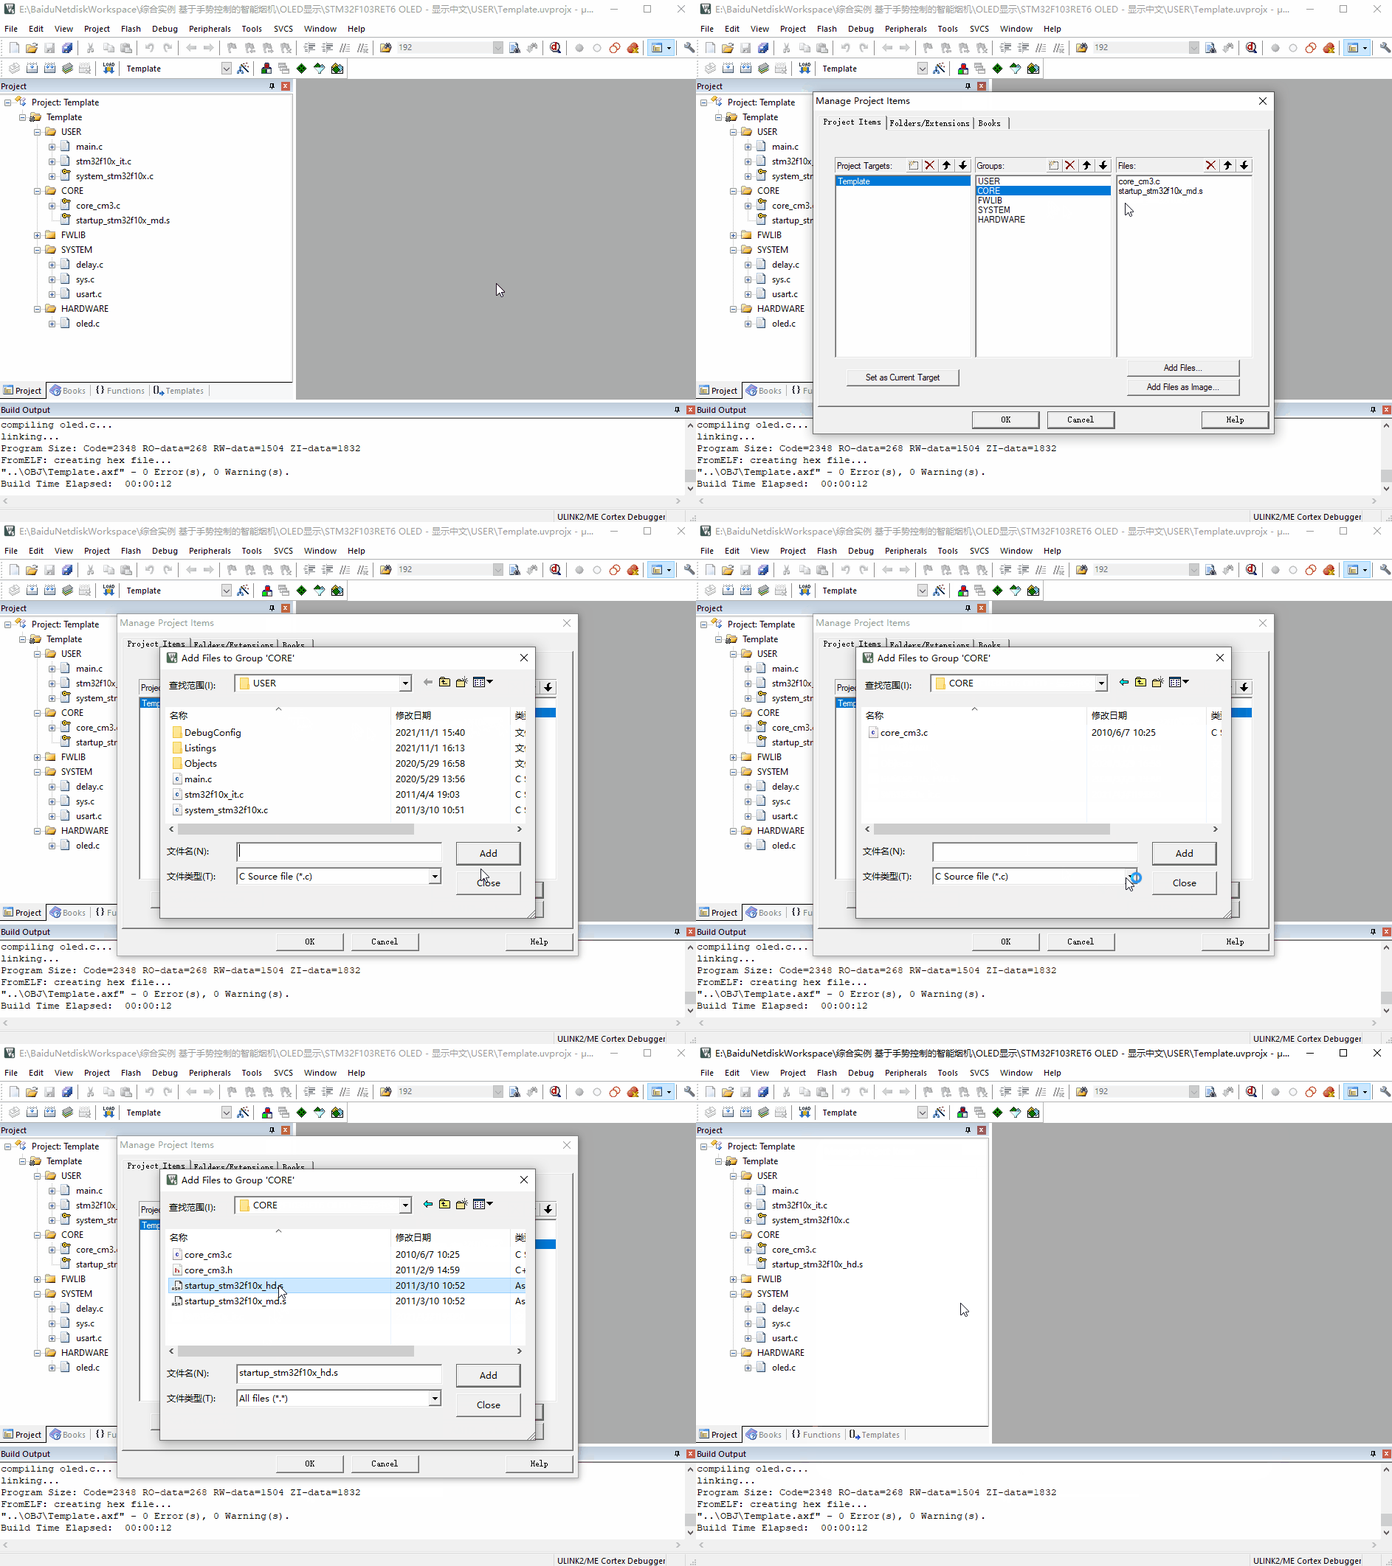
(1) 因为STM32F103C8T6和STM32F103F103RET6的闪存容量不同,前者8=64K,后者E=512K,所以需要将工程中原有的启动文件 startup_stm32f10x_md.s 修改为:startup_stm32f10x_hd.s :

(2)设置工程。
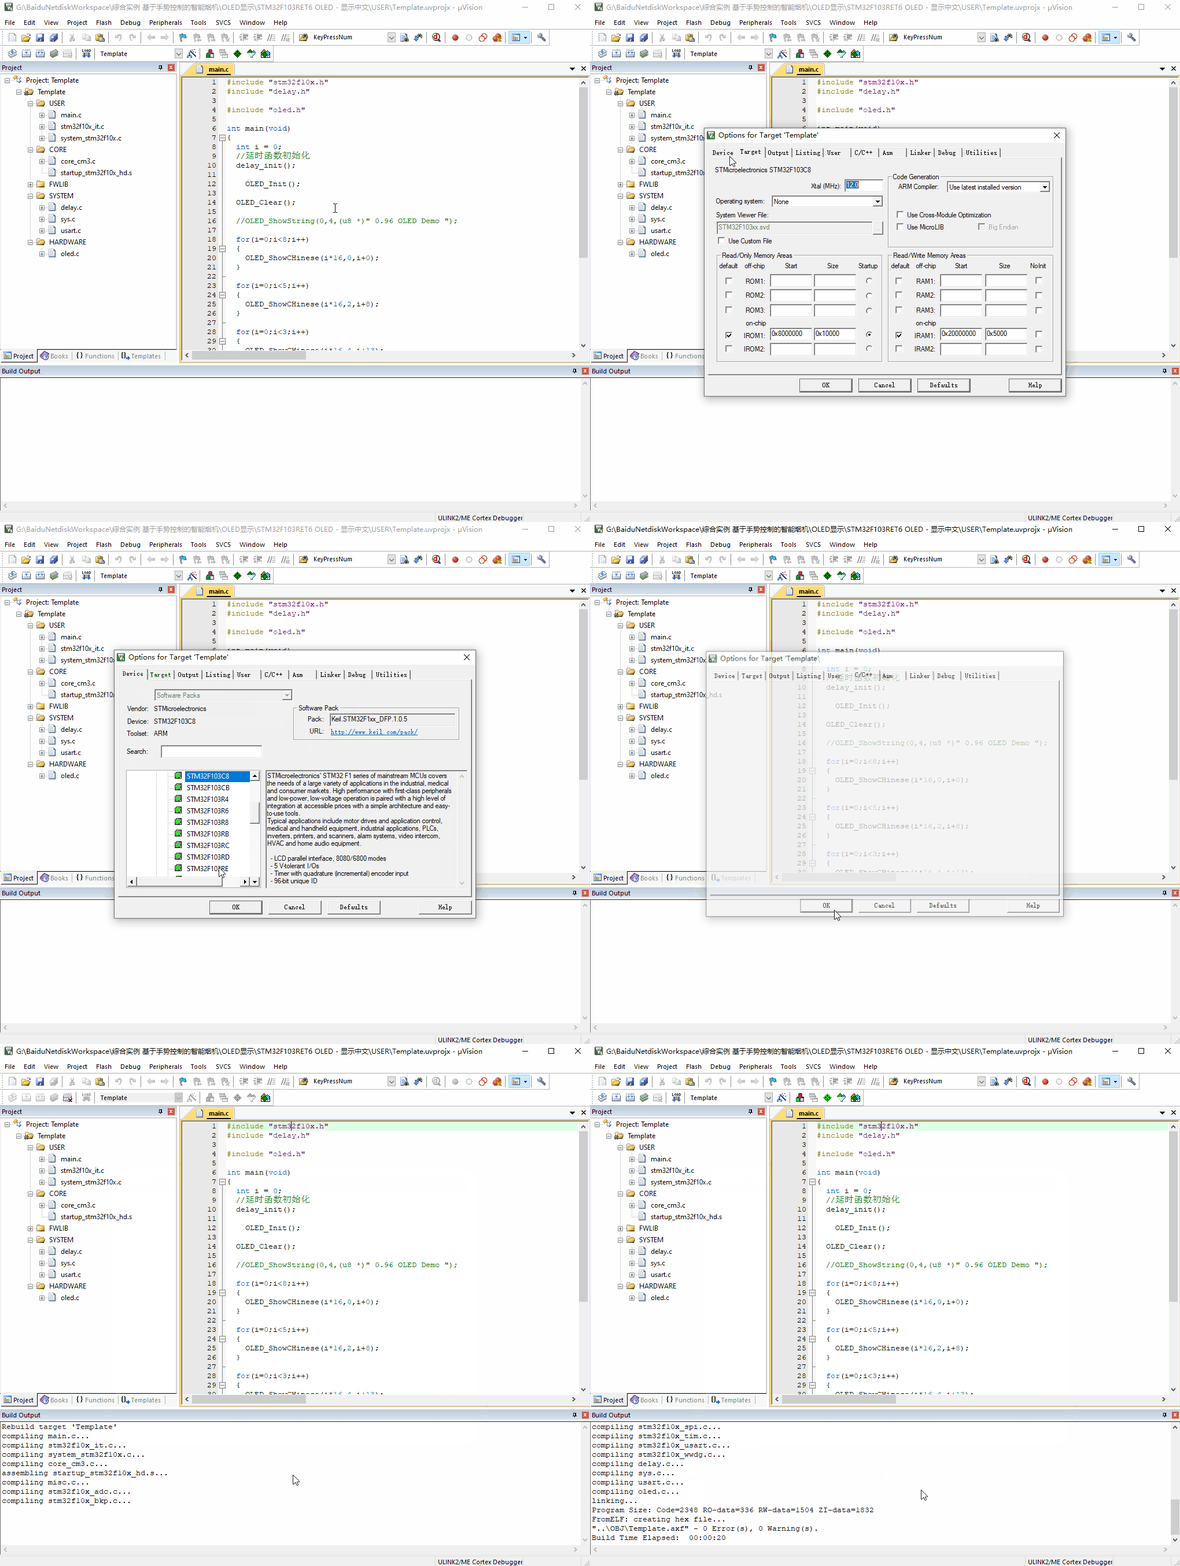
- Options 中 Device修改为 STM32F103RE
- Options 中 C/C++ 标签下的宏定义修改为:STM32F10X_HD,USE_STDPERIPH_DRIVER

修改实际连接的硬件引脚
这次板子的硬件连接如下:


因为跟之前网文分享的Demo连接的硬件引脚已经变换,所以我们要对工程中,对GPIO初始化部分的代码进行改写:
void OLED_Init(void)
{
  GPIO_InitTypeDef  GPIO_InitStructure;

 RCC_APB2PeriphClockCmd(RCC_APB2Periph_GPIOC, ENABLE);

 GPIO_InitStructure.GPIO_Pin = GPIO_Pin_0|GPIO_Pin_1|GPIO_Pin_2|GPIO_Pin_3|GPIO_Pin_13;
  GPIO_InitStructure.GPIO_Mode = GPIO_Mode_Out_PP;     //推挽输出
 GPIO_InitStructure.GPIO_Speed = GPIO_Speed_50MHz;   //速度50MHz
  GPIO_Init(GPIOC, &GPIO_InitStructure);        //初始化GPIO
  GPIO_SetBits(GPIOC,GPIO_Pin_0|GPIO_Pin_1|GPIO_Pin_2|GPIO_Pin_3|GPIO_Pin_13);

 OLED_RST_Set();
 delay_ms(100);
 OLED_RST_Clr();
 delay_ms(200);
 OLED_RST_Set();

 OLED_WR_Byte(0xAE,OLED_CMD); //--turn off oled panel
 OLED_WR_Byte(0x00,OLED_CMD); //---set low column address
 OLED_WR_Byte(0x10,OLED_CMD); //---set high column address
 OLED_WR_Byte(0x40,OLED_CMD); //--set start line address  Set Mapping RAM Display Start Line (0x00~0x3F)
 OLED_WR_Byte(0x81,OLED_CMD); //--set contrast control register
 OLED_WR_Byte(0xCF,OLED_CMD);  // Set SEG Output Current Brightness
 OLED_WR_Byte(0xA1,OLED_CMD); //--Set SEG/Column Mapping     0xa0左右反置 0xa1正常
 OLED_WR_Byte(0xC8,OLED_CMD); //Set COM/Row Scan Direction   0xc0上下反置 0xc8正常
 OLED_WR_Byte(0xA6,OLED_CMD); //--set normal display
 OLED_WR_Byte(0xA8,OLED_CMD); //--set multiplex ratio(1 to 64)
 OLED_WR_Byte(0x3f,OLED_CMD); //--1/64 duty
 OLED_WR_Byte(0xD3,OLED_CMD); //-set display offset Shift Mapping RAM Counter (0x00~0x3F)
 OLED_WR_Byte(0x00,OLED_CMD); //-not offset
 OLED_WR_Byte(0xd5,OLED_CMD); //--set display clock divide ratio/oscillator frequency
 OLED_WR_Byte(0x80,OLED_CMD); //--set divide ratio, Set Clock as 100 Frames/Sec
 OLED_WR_Byte(0xD9,OLED_CMD); //--set pre-charge period
 OLED_WR_Byte(0xF1,OLED_CMD); //Set Pre-Charge as 15 Clocks & Discharge as 1 Clock
 OLED_WR_Byte(0xDA,OLED_CMD); //--set com pins hardware configuration
 OLED_WR_Byte(0x12,OLED_CMD);
 OLED_WR_Byte(0xDB,OLED_CMD); //--set vcomh
 OLED_WR_Byte(0x40,OLED_CMD); //Set VCOM Deselect Level
 OLED_WR_Byte(0x20,OLED_CMD); //-Set Page Addressing Mode (0x00/0x01/0x02)
 OLED_WR_Byte(0x02,OLED_CMD); //
 OLED_WR_Byte(0x8D,OLED_CMD); //--set Charge Pump enable/disable
 OLED_WR_Byte(0x14,OLED_CMD); //--set(0x10) disable
 OLED_WR_Byte(0xA4,OLED_CMD); // Disable Entire Display On (0xa4/0xa5)
 OLED_WR_Byte(0xA6,OLED_CMD); // Disable Inverse Display On (0xa6/a7)
 OLED_WR_Byte(0xAF,OLED_CMD); //--turn on oled panel

 OLED_WR_Byte(0xAF,OLED_CMD);  /*display ON*/
 OLED_Clear();
 OLED_Set_Pos(0,0);
}
修改GPIO操作的宏定义为:
#define OLED_SCLK_Clr() GPIO_ResetBits(GPIOC,GPIO_Pin_13)   //CLK PC13 SCK D0
#define OLED_SCLK_Set() GPIO_SetBits(GPIOC,GPIO_Pin_13)

#define OLED_SDIN_Clr() GPIO_ResetBits(GPIOC,GPIO_Pin_0)   //DIN PC0 MISO D1
#define OLED_SDIN_Set() GPIO_SetBits(GPIOC,GPIO_Pin_0)


#define OLED_RST_Clr() GPIO_ResetBits(GPIOC,GPIO_Pin_1)    //RES PC1
#define OLED_RST_Set() GPIO_SetBits(GPIOC,GPIO_Pin_1)

#define OLED_DC_Clr() GPIO_ResetBits(GPIOC,GPIO_Pin_2)    //DC PC2
#define OLED_DC_Set() GPIO_SetBits(GPIOC,GPIO_Pin_2)

#define OLED_CS_Clr()  GPIO_ResetBits(GPIOC,GPIO_Pin_3)    //CS   PC3
#define OLED_CS_Set()  GPIO_SetBits(GPIOC,GPIO_Pin_3)
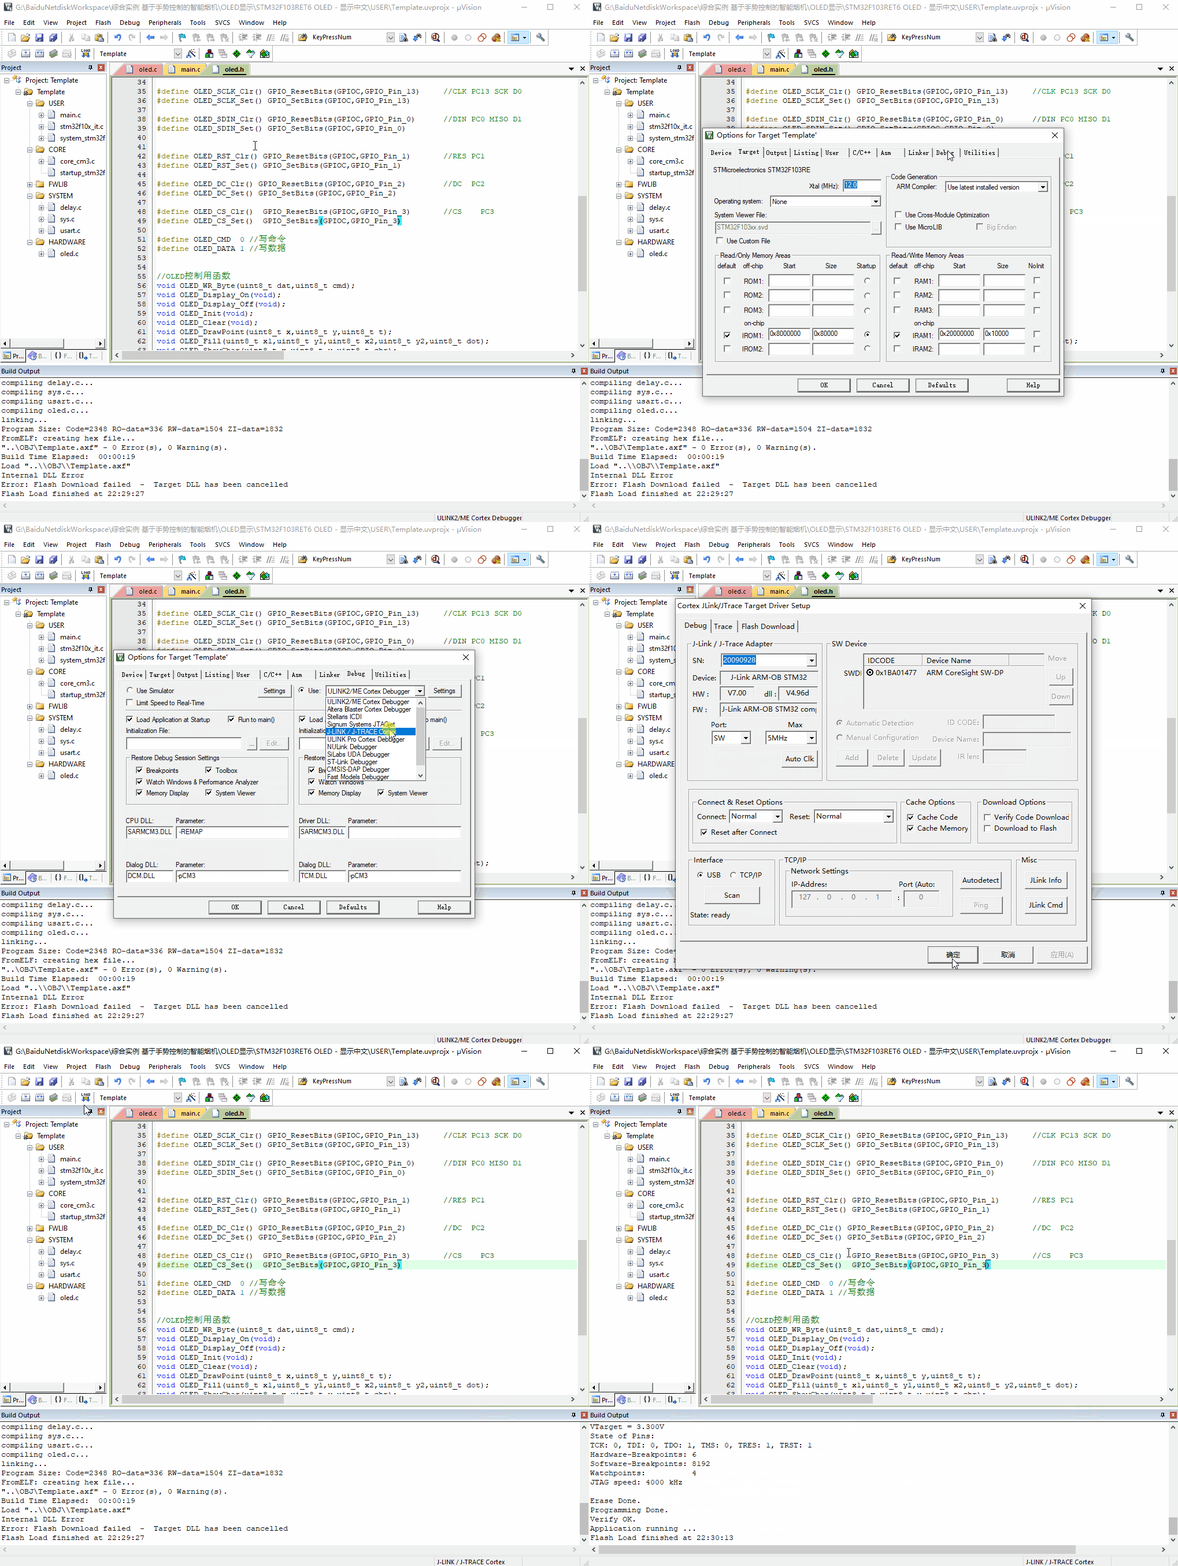
修改下载工具为JLINK(根据个人实际修改)。

注意: Flash Download 要修改为 512k的 STM32F10x High-density Flash
下载程序之后,OLED上成功显示文字,达到预期效果,Demo修改完成。

制作图片素材
制作位图
利用PS制作一个 128*64 分辨率的bmp格式的位图。

取模
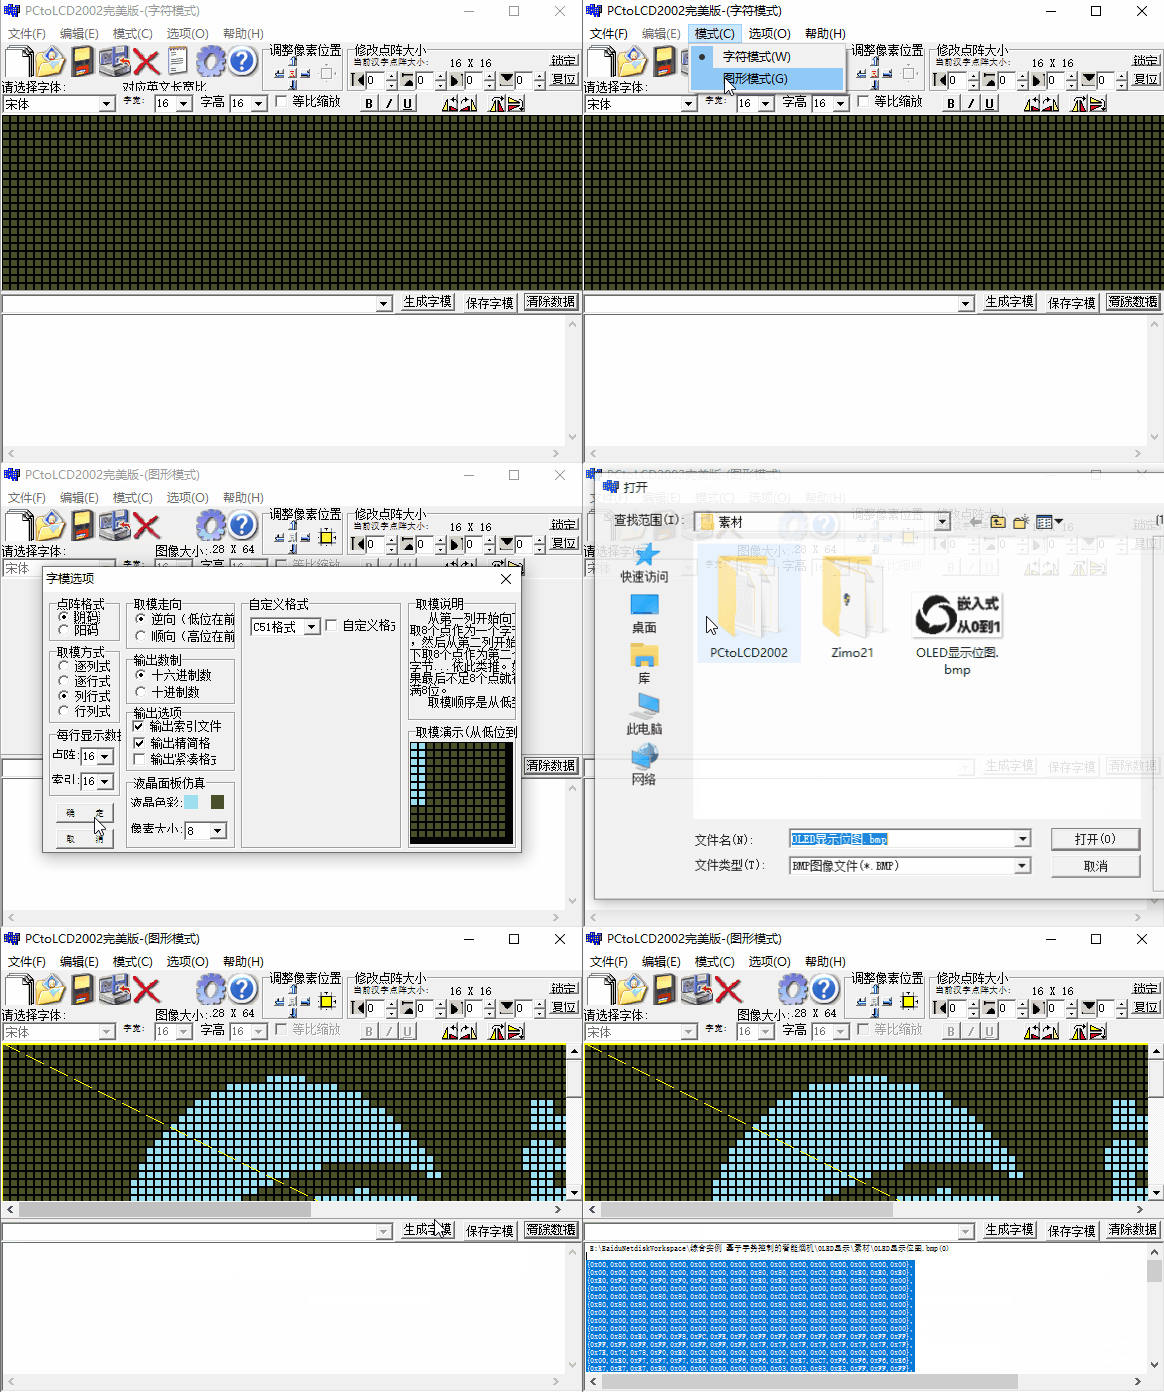
使用 PCtoLCD2002 软件生成字模。

显示位图
显示位图函数如下:
void OLED_DrawBMP(unsigned char x0, unsigned char y0,unsigned char x1, unsigned char y1,unsigned char BMP[])
{
 unsigned int j=0;
 unsigned char x,y;

 if(y1%8==0) y=y1/8;
 else y=y1/8+1;
 for(y=y0;y<y1;y++)
 {
  OLED_Set_Pos(x0,y);
  for(x=x0;x<x1;x++)
  {
   OLED_WR_Byte(BMP[j++],OLED_DATA);
  }
 }
}
函数调用:
OLED_DrawBMP(0,0,128,8, BMP3);
其中数组BMP3中存放的就是位图的字模数据。
结果展示

总结
今天的内容比较简单,学起来,说不定哪天就能用上了。


